I'm in the process of moving the content of this blog over to its new home!
khoolballoons.com
Please update your bookmarks. I'll have some new entries up soon!
Monday, March 21, 2011
Sunday, December 26, 2010
Mr. Penguin and snow!
This year, Atlanta experienced its first white Christmas since 1882! I remember always wishing for a white Christmas as a child (but now I get tons of snow living in the Northeast.) We got maybe almost 2 inches of snow, and many churches were closed due to the icy roads.
During our family Christmas Eve dinner, some of my cousins suggested I make a penguin balloon. So, being "snowed in" this morning, I took some black, white, and orange balloons and decided to give it a try. I designed this penguin balloon off the top of my head. Below is the resulting Mr. Penguin, playing in the historic Atlanta snow!

To make this penguin, I used two small white 5" round balloons, two black 260s, an orange 160 (scrap), an orange 260 (scrap), and a red 160 (scrap).
First, I used one (entire) black 260 (inflated with a 4" tail) to make the head and the first loop for the body. The eyes are made from a white round not fully inflated, twisted in half. The white part of the body is a white round. I then used the second black 260 for the back of the penguin body and tail (you don't need to use the whole balloon.) The beak is a very small scrap of orange balloon, and the feet and bow tie from 160 scraps. I'm pleased with my first try at a penguin.

Mr. Penguin making snow angels

Mr. Penguin biking in the snow
Tuesday, December 21, 2010
Merry Christmas everyone!
Last Saturday my church hosted a Children's Christmas party. It was a lot of fun, with crafts, gifts, and also Koko the clown, who entertained the guests with magic tricks, juggling, balloons, and shared about the meaning of Christmas. At the end, we also gave each kid a balloon animal, with which I helped out.
Because we were expecting possibly 100 kids, I tried to think of simpler balloon animals. We gave out red flowers, camels (which the wise men rode), and sheep (who were present in the stable where baby Jesus slept.) I was out of green 260 balloons, so I cut the red (for the petals) and green (for the stem) 160 balloons into halves to make two smaller flowers.
 Camel: The camel balloon was a pretty simple animal to make. I went with a one-balloon design based on this camel youtube video. I simplified the design a bit - I didn't do the tulip twist, and because I wanted the knot to be at the tail and not on the head, I started by making the tail first (instead of the head.) You'll want to leave a little bit less than a 4 inch tail when inflating the balloon. I like to use up the entire balloon, and it may take you a try or two to get the size of the legs and body of the camel just right so that you have just the right amount left for the neck and head. After you are done twisting, bend the neck of the camel upwards, and bend the head downwards.
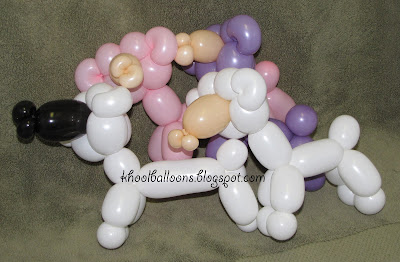 Sheep: The sheep is a little more complex than the camel, as it uses two balloons and requires more knot tying. I followed these instructions from Professor Wonder to make this balloon. I also simplified this balloon in that I didn't use the tulip (apple) twist to attach the two balloons. Instead I just tied the ends together. (I'm not too good with the tulip twist and often end up popping the balloon.) In addition to white sheep, I also made a few that were blue, pink or purple, and used either black and blush for the head. (The kids preferred blush over black.) I try to use up the entire balloon here as well, so I don't have do any additional cutting or tying.
Professor Wonder also has a two-balloon camel design, as well as other characters from the nativity scene.
After you finish making the camel and/or sheep, you can use a Sharpie or dry erase marker to draw the eyes and mouth.
[ One-balloon camel video by Charles ]
[ Sheep instructions and other nativity characters by Professor Wonder ]
Because we were expecting possibly 100 kids, I tried to think of simpler balloon animals. We gave out red flowers, camels (which the wise men rode), and sheep (who were present in the stable where baby Jesus slept.) I was out of green 260 balloons, so I cut the red (for the petals) and green (for the stem) 160 balloons into halves to make two smaller flowers.


Professor Wonder also has a two-balloon camel design, as well as other characters from the nativity scene.
After you finish making the camel and/or sheep, you can use a Sharpie or dry erase marker to draw the eyes and mouth.
[ One-balloon camel video by Charles ]
[ Sheep instructions and other nativity characters by Professor Wonder ]
Sunday, December 12, 2010
One-balloon parrot

This parrot (sitting on a perch) is one of my favorite one-balloon animals to make. It is fast and easy - only requiring about 4 twists, and looks very much like a parrot. If the outside loop (perch) is too small, you can have a kid wear it so that it looks like the parrot is sitting on the kid's arm/shoulder. Just twist the balloon so that the bird is not in the circle and have a kid put his or her arm through the loop (with the bird sitting on top.)
Wednesday, December 1, 2010
Fish balloon - one of the favorites!

This fish balloon is always one of the favorites. It's actually not too complicated to make - it's the combination of color and shapes that makes this fish really cool.
Video instructions: How to make a balloon fish
 This fish uses five balloons - two 260s, one large round balloon for the body, and two small ones for the eyes. (If you don't have small round ones, you can use a 260 to make the eyes with a couple loops twists.) Choose colors that will go well together.
You'll basically make two pinch twists (which might be the most difficult part) for the lips and two loop twists for the fins.
After making the balloon, I like to give a kid the chance to draw in the eyeballs/eyelashes, which they always enjoy.

[ Video link : How to make a balloon fish ]
I want a hippopotamus for Christmas...
This cute hippo design uses one 260 balloon and one pink heart balloon. I used a gray 260 balloon, but a silver, brown, or even light purple, light green, or light blue one would work well. This is another neat way to use a heart balloon. (I've seen a heart balloon used similarly in a cow balloon design as well.)
To make the balloon, follow these hippo balloon instructions by Bonnie Davis.

My comments: When inflating the balloon, you'll want to leave about a 5 inch tail. (If you leave less of a tail, you'll run of space for the balloon to expand.) Near the end, if you find that you've run out of balloon or don't have room to make any additional twists, you can settle for only using four belly balloons (instead of five). Just deflate the remaining bubble that you don't need, tie a knot, cut off part of the end if it's too long, and wrap the knot around the body to hide it. Your hippo body will only be made of four bubbles and won't be as big, but will still look pretty good.

[ Hippo balloon instructions by Bonnie Davis ]
Wednesday, November 17, 2010
Froggies! (and snake)

I’ve seen some different frog designs, and here’s a pretty simple one that I like. It uses a green 260 balloon for the frog body, and a bit of yellow or white (you can use a leftover scrap) for the eyes.
See the video here. (The person in the video has also made many other videos which are available from the same site, and are worth a look.)
Comments on the video instructions: You will want to leave about a 4.5 inch tail when blowing up the green balloon. I quickly ran out of “balloon” and had to make sure not to make any bubbles too large. If you do find that you’ve run out of balloon, you can just make the two legs from a second green balloon and then attach them.
To make a simple snake: just make the head of the frog. When blowing up the balloon, leave a smaller tail (around 1.5 inches), as you won't be making as many twists. After making the head, bend the rest of the balloon into a zig-zag shape. Push the air into the uninflated part of the balloon. I also attached an uninflated piece of leftover red balloon for the snake tongue.
[ Video instructions by Dale Obrochta ]
Subscribe to:
Posts (Atom)